Showing posts with label and. Show all posts
Showing posts with label and. Show all posts
Wednesday, March 5, 2014
Whirligig And Contest winners!

Mine is certainly an entry-level whirligig. Its pretty easy to make. The trickiest part was figuring out what kinetic action I wanted it to do. I decided on a lumberjack; sort of a classic whirligig. Instead of the typical clothing, I decided to paint him as a character I envision from a Steinbeck novel. If you would like to try this one, heres a PDF template you can use to cut out the pieces.
*****
Mere Mortals video contest winners!
There were so many good entries. Thank you all for entering!

Sunday, February 23, 2014
BITS AND PIECES nightstand cabinet details
I get a large amount of comments suggesting
I must have the vision of each project in my head before I start.
This is NOT the case.

When I am in the mits of a building project there is a lot of sitting around and staring.
That doesnt sound quite right does it?
I sit back and look at what I have chosen to work with that day.
I look at each line, surface, and element on its own.
I suppose it is really shapes I see it my head.
How I want the shapes to be and figure out what I might have to create that look.

I started this project knowing I wanted the open space in the nightstands to have doors.
So off I go searching with a tape measure looking for something that might work.

What I found was the sliding panels that use to be part of this bookshelf,
but I used them sideways from their original install.
Yes ... thats the same shelf I showed you yesterday.
Told you then it was a long story.

Now that I had fun and interesting doors I had to trim
the boring flat drawer faces to have more character.
I have used this same trim on several different projects.
You can see another set of drawers I used it on here
and my bucket of it here.

With the original decoration on the door it only made sense
to mimic the look on the drawer face with the same shape, so I added the oval pull.
Im off to paint another bathroom vanity today so when I can find a bit more
time I will talk about more elements of the process and this cabinet.
Id love it if you would all stop into the Customers page
and take a peek at the newest photo and comment regarding their new vanity.
Saturday, February 22, 2014
Cutting boards new design discussion and plans
Hi Everyone,
Well, I got a new garage door today, to replace the old, much patched one. This one is insulated and should make for both a warmer home in winter and a cooler one this summer.
As soon as work finished on the door, I got to work on a new breadboard. My old ones were round, flat, and not much else. Since both sides of the board have to be turned and worked on, I didnt have a method for attaching the board blank to the lathe without drilling holes in or cutting a tenon. This results in a cutting board with holes on the top-not a very satisfactory situation.
Then I remembered turners tape. Turning tape is a heavy duty, cloth tape that is sticky on both sides. Its so sticky that if you touch it its like trying to get unstuck from super glue. This enables a wood turner to attach a blank to a faceplate and then to the lathe without drilling holes at all. So one face of the board will be solid and smooth. Lets take a look:
I had a very wide piece of white ash in the wood pile that was too thin to turn into a tray or a dish but would be just right for a cutting board. I fished it out and measured it and cut it into a big circle


The tape is first applied to the face of the faceplate. The surface has to be perfectly clean and the wood has to be smooth and dust free:

Next I placed the face plate exactly in the center of the blank and pushed down:

Since this type of tape is pressure sensitive, I placed several bricks on top of the faceplate and let that whole thing sit for about 20 minutes:


Here we are after about 30 minutes of work. Ive cut a small cove for fingers to grab onto, and smoothed and sanded the surface. The tenon is still there.

I flipped over the blank and attached it to the chuck and turned the surface. It had to be smoothed and flattened, another cove cut at the edge for fingers to grip on and a juice groove along the edge. This is the top of the cutting board...

...and this is the bottom.

Read More..
Well, I got a new garage door today, to replace the old, much patched one. This one is insulated and should make for both a warmer home in winter and a cooler one this summer.
As soon as work finished on the door, I got to work on a new breadboard. My old ones were round, flat, and not much else. Since both sides of the board have to be turned and worked on, I didnt have a method for attaching the board blank to the lathe without drilling holes in or cutting a tenon. This results in a cutting board with holes on the top-not a very satisfactory situation.
Then I remembered turners tape. Turning tape is a heavy duty, cloth tape that is sticky on both sides. Its so sticky that if you touch it its like trying to get unstuck from super glue. This enables a wood turner to attach a blank to a faceplate and then to the lathe without drilling holes at all. So one face of the board will be solid and smooth. Lets take a look:
I had a very wide piece of white ash in the wood pile that was too thin to turn into a tray or a dish but would be just right for a cutting board. I fished it out and measured it and cut it into a big circle
The tape is first applied to the face of the faceplate. The surface has to be perfectly clean and the wood has to be smooth and dust free:
Next I placed the face plate exactly in the center of the blank and pushed down:
Since this type of tape is pressure sensitive, I placed several bricks on top of the faceplate and let that whole thing sit for about 20 minutes:
Ive taken the bricks off and mounted the blank on the lathe. This seems very sturdy even though there are no screws holding the plate and the blank together. Im going to sharper my tools and take very gentle shallow cuts to flatten and smooth the surface. In this photo you can also see that Ive cut a shallow tenon for the 4 jaw chuck to attach to when I turn it over:
Here we are after about 30 minutes of work. Ive cut a small cove for fingers to grab onto, and smoothed and sanded the surface. The tenon is still there.
I flipped over the blank and attached it to the chuck and turned the surface. It had to be smoothed and flattened, another cove cut at the edge for fingers to grip on and a juice groove along the edge. This is the top of the cutting board...
...and this is the bottom.
I am going to re-attach it to the faceplate with tape again and tune off the mortise and tenon and very gently dish out the center of the board then sand it smooth. I suspect by doing this the board will continue to sit flat and stable if warps a little bit.
So Im going to break for coffee and lunch and Ill be back shortly.
VW
Thursday, February 20, 2014
Benefits of Building a Chicken Coop Cheap Simple Affordable and Fast!
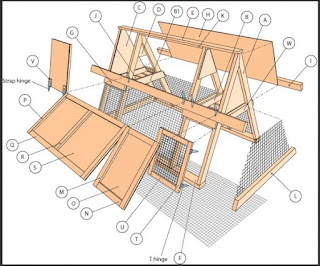
Why Building A Chicken Coop?
There are many benefits that come with knowledge of almost any kind. In the current economy, those who have physical skills, like the skills required to build a cheap chicken coop may soon be the most highly demanded people on the planet. After all, youre going to need more than pictures in order to figure out the intricacies of building a chicken coop cheap and fast.Some people prefer buying chicken coop kits. These kits are great because in addition to the instructions, they also have the materials that will be needed in order to build from the coop design that has been included. Theres no worry over purchasing the proper amount of supplies or having a lot left over when the project is finished. Its great for those who are looking for a weekend project to do with their children or who just dont want the hassle of buying all the pieces and part.
Some people however really like the idea of building these coops for themselves. Theyd rather by hen-house construction plans and build one of their very own. Some scouting groups are doing this as community projects and many families are doing this in an effort to live "greener" lifestyles or just to have something fun for the entire family to pitch in and work on.
Whatever the reasons you have for learning how to build a portable chicken coop, youre likely to find the experience to be one that is quite rewarding. Learning how to build simple mobile coops is great in its own right but the benefits go much further than that. Once you learn how to build these coops for yourself or for others, youll have that knowledge and can use it to build a chicken house to sell to others.
Not very long ago, the economy was looking up and very few people would have even considered making a decent living doing something like learning how to build a simple chicken house. Things have changed though. Whether youre out of work and looking for a great way to bring in a few extra bucks until the job market is a more friendly place or youre looking to supplement a stagnate income, the right coop plan can help you build cheap chicken coop houses that can turn into a rich investment of time for you.
Knowledge like this is almost always worth having. See for yourself today how valuable it can be for you to learn the secrets behind building chicken coops for food, fun, and profit today.
Wednesday, February 19, 2014
Wood shop odds and ends
Hi Everyone,
Ive been working like a maniac the past several days coming up with new things for the SWW product line. I especially wanted to develop items that use smaller pieces of wood and I think Ive hit it with the following items:

The carrot shaped thing in the following photo is a garden dibble. These are used to plant flower bulbs and the business end of it is scored in 1 inch increments. This is made out of white pine and it smells like a pine forest:

Ive also made a number of darning eggs. I was going to drop them from the SWW product line because they didnt sell well but my husband talked me into making them again. So Ive made a number of them, but this time without a handle:

Im also making kitchen mallets again out of the same lumber I use to make rolling pins. Here are two mallets out of red birch and ash wood:

And I took the laminated block out of the clamps this morning. I think this will work out well:

Have a good weekend and see you soon,
VW
Monday, February 10, 2014
Corner blocks and fluted trim
If youve been thinking about doing corner blocks with your trim, here are some pics of a basement Im finishing in Sylvania, Ohio that has just that. This project also calls for fluted trim to be used for the casing as well as the base - take a look!


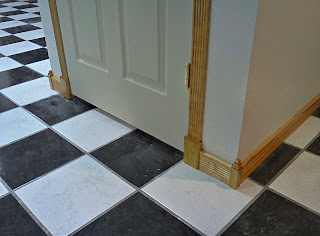

This is a display area (shadowbox) that Ive installed and trimmed out.


Read More..
This is a display area (shadowbox) that Ive installed and trimmed out.
Making Mouldings and Shaping Wood
Warning: This is a ridiculously long post!
 The first two days of the week was dedicated to the mouldings and Im happy to say theyre complete...finally! Funny now thinking back to when I ordered my moulding planes from Philly Planes in England, I had some comments from readers wondering how theyd perform in the oak...well if I didnt say it enough then Ill say it again - theyre great! Lots of miles and lots of shavings, Im very happy with these planes and the resulting mouldings Ive made with them. Theres a charm when you see hand cut mouldings versus a moulding that was manufactured with a Router bit. No comparison really, the small discrepancies and slight imperfections are what make them so unique and to my eye, rather beautiful. The gentle curves are obviously made by hand (no pun intended) and add a kind of crafted appeal to the overall aesthetic of the door.
Id certainly recommend anyone thinking about a project with lots of mouldings to consider Philly Planes and to leave the router unplugged. Making them is not hard work but does take some time...I really enjoyed the process and will no doubt incorporate some moulding details into a furniture piece somewhere down the road.

So the mouldings were done on Monday evening and instead of turning my attention to sawing out the scroll detail under the window sill (which you may remember I intended to do next) I decided to keep going on the moulding details while I had the bench set up with the sticking board and moulding planes and finish off all of these trim elements for the door. The corner pieces, a kind of architectural element, were at first a bit of a puzzle... How would I shape them? What would be my first step? After some consideration I decided to form the upper corner pieces as one long piece and then saw them down to size. Youll see what Im talking about as I go through the process...The first step was to go back to my notes and make myself a template.
 For my own use Ive been calling these elements dentils. I dont think thats accurate but what ever the proper terminology is they were next. Not surprising, I have a few nice off cuts of white oak around the shop and I traced my little card board cut out onto the edges of the stock - both ends of it. My kids were wondering what I was doing with the cereal box and scissors down in my shop....a little art time in the basement perhaps? (the cardboard from the cereal box was cut up to become the template if youre wondering!)I should also mention how I originally went about getting these templates...I should have showed you this way back when I suppose? Anyhow, I used a Stainless-Steel Tracing Profile Gauge I purchased from Lee Valley. This is the tool you need for finding profiles. Heres a shot I dug up from the process with the tool in use-Im (secretly) getting the profile of the side mouldings for the window frame here at my clients neighbours door...

So back at the bench with my template ready to go I traced the profile and establish a series of rabbets and dados to remove the bulk of the waste. The same process of making the smaller mouldings just on a larger scale this time. Beginning with my marking gauge I carefully scribe deep, crisp lines to register the cutting iron of my plough plane.

In hind sight I should have re-sawn the stock to its finished thickness before I cut the profiles but I went ahead and started the process. It all worked out fine but for anyone out there doing this type of work, re-saw to final thickness before you cut out the profiles. Theres a lot less chance of damaging the piece.

I set the plough plane and work down the grooves into the oak. I wasnt too far along before I ran into another small, unforeseen problem. This profile is longer than the arms reach on my small plough plane so to cut these dadoes through the center portion of the blank I would need to come up with an alternate method. I thought about simply sawing down on my scribe lines and removing the waste with my router plane but I remembered seeing an attachment Lee Valley offers for their skew rabbet plane. Its a pair of posts to make an arm extension-I wondered if it would fit the threads of the plough plane? I grabbed the rabbet plane and un-screwed the arms and tried them in the plough plane...theyre the same. Good. A quick trip down to Lee Valley and $11.00 later I purchased these extension arms that fit and work fine in both plane models.

Something to consider if you already own either of these planes; a nice way to turn the small plough plane into a large.? Speaking of the name small plough plane I wonder if they may be offering a large in the future?

With the new extension arms attached I finish off the grooves...

Then its back to the moulding planes to start shaping the hollows and rounds. A series of passes from my number 4 up through to my number 12 will fair this main curve into the profile.

Now that the main shape is established I can go ahead and re-saw the stock.

The blank Im using is 2" thick by 6" wide and in the neighbourhood of 8" long; my Bad Axe back saw burns down through the hardwood with ease. A quick clean-up and Ill cross cut the piece into the two corner dentils.

At this stage they still need some fine sanding and the curves still need a little more fairing but for tonight theyre done. These two pieces will live at the top of the window mouldings creating a nice focal point thatll draw the eye to the top of the door.

It was a lot of fun making these two pieces, theyre something I probably never would have considered if this was a door I designed myself but Im happy with the look of them and Im anxious to move on to the other small architectural elements that fall at the bottom of these same side mouldings. Lets take a look at the steps I took in making them:
 Back in the note book I carefully transfer my lines over to the wood stock and mark out the main dimensions of the profile. I then made another template and trace the shape to the blank. These profiles arent the same kind of shape as the previous so its not going to be a simple matter of removing the waste with the plough plane. If this was a shop full of power tools Id simply walk over to the band saw and cut out the profile? (probably cut off the lower portion of my arm in the process!) All joking aside I decided to shape these two small detail pieces with a technique I used when building boats back in Cape Breton. When shaping a stem for a small sail boat or a dinghy Id create a series of cuts down through the stock, establishing the side profile and then carve away the fat; same technique used here but only a much smaller scale. With that in mind I take the blank and on my bench hook begin the series of cross cuts...

Funny with all of the beautiful back saws hanging around my work shop I reach for my Japanese pull saw; a Dozuki. For small work like this, when I want to keep things very precise while maintaining the thinest kerf possible its the Dozuki that shines. Notice where the stock is sitting in relation to the hook? A pull saw remember...that may shed some light as to why the fence is located where it is...(the plans for this and four more work shop appliances are in my book.)

The cross cutting is complete Ill move over to the face vise to rip out the waste.

Im careful to follow down the profile removing each small section as I go...this is fun!

Now that I have the main profile roughed out I use a wide paring chisel to establish the main surface area of these small components; my scribe lines are still there, deeply set into the sides of the oak so I have a nice solid reference to work down to.

The thin little groove at the top of these pieces would be a real challenge to clean out but thanks to my detail chisels Im able to accurately get in there and pare away the waste. This is a 1/16" wide, tapered chisel executed in a mortise-chisel shape to give it the required stiffness for such a narrow cutting tool. Designed by Yeung Chan, a California cabinetmaker and manufactured by Canadian knife maker Paul Beebe I cant say enough about these small chisels. Ive mentioned them before in posts but always reinforce the fact that theyre probably the most used tools in my work shop!

The sloped area is first shaped with a 6" Kutzall file; with jagged, carbide teeth they eat through wood in a hurry! Sometimes too fast so Im careful to watch my progress.

From there the curve is refined and smoothed with a finer cabinet file...

and finally a bit of sand paper...I use the Norton 3X brand which seems to work faster, is less prone to load and doesnt rip and shred quite as fast as the other brands Ive tried. To be honest, I absolutely hate sanding so the quickest, cleanest product I can find I use.

Now that the curved area is complete Ill take a full sheet of that same paper and on a 1/4" piece of safety glass work the sides of the pieces. Normally I would reach for a hand plane but because of the size of these elements and the small bead at the front, the last thing Id want is to tear out some wood or mess up the profile. A few minutes with the sand paper on glass and Im ready for the final steps in making these pieces.

The door design dictates two small squares set in the lower front edge and to make them Ill stay with the Dozuki. A couple of small cuts after careful lay-out will establish the waste area needing to be removed. I pay close attention not to saw down too far going beyond my finished surface depth.

A bit of chisel work to remove the waste...

and then some clean up. A few small chamfers again with my detail chisels and I can call these pieces done.

Here they are with the other door elements...

And finally a shot of the two lower components showing where theyll live in relation to the side window mouldings. This is actually the interior of the door and all of these pieces will be on the outside but youll get the idea!

With that Ill stop for tonight-all thats left is the scroll under the window sill and some final clean-up. With any luck Ill be slappin on some finish by Sunday and beginning the glue up early next week.
If youve read this far Ill say thanks...this post was starting to turn into a short novel! Sorry about that...just wanted to show the entire process of making these elements. I enjoyed making them and hope you enjoyed watching the process as well.
Cheers!
Read More..
The first two days of the week was dedicated to the mouldings and Im happy to say theyre complete...finally! Funny now thinking back to when I ordered my moulding planes from Philly Planes in England, I had some comments from readers wondering how theyd perform in the oak...well if I didnt say it enough then Ill say it again - theyre great! Lots of miles and lots of shavings, Im very happy with these planes and the resulting mouldings Ive made with them. Theres a charm when you see hand cut mouldings versus a moulding that was manufactured with a Router bit. No comparison really, the small discrepancies and slight imperfections are what make them so unique and to my eye, rather beautiful. The gentle curves are obviously made by hand (no pun intended) and add a kind of crafted appeal to the overall aesthetic of the door.Id certainly recommend anyone thinking about a project with lots of mouldings to consider Philly Planes and to leave the router unplugged. Making them is not hard work but does take some time...I really enjoyed the process and will no doubt incorporate some moulding details into a furniture piece somewhere down the road.
So the mouldings were done on Monday evening and instead of turning my attention to sawing out the scroll detail under the window sill (which you may remember I intended to do next) I decided to keep going on the moulding details while I had the bench set up with the sticking board and moulding planes and finish off all of these trim elements for the door. The corner pieces, a kind of architectural element, were at first a bit of a puzzle... How would I shape them? What would be my first step? After some consideration I decided to form the upper corner pieces as one long piece and then saw them down to size. Youll see what Im talking about as I go through the process...The first step was to go back to my notes and make myself a template.
For my own use Ive been calling these elements dentils. I dont think thats accurate but what ever the proper terminology is they were next. Not surprising, I have a few nice off cuts of white oak around the shop and I traced my little card board cut out onto the edges of the stock - both ends of it. My kids were wondering what I was doing with the cereal box and scissors down in my shop....a little art time in the basement perhaps? (the cardboard from the cereal box was cut up to become the template if youre wondering!)I should also mention how I originally went about getting these templates...I should have showed you this way back when I suppose? Anyhow, I used a Stainless-Steel Tracing Profile Gauge I purchased from Lee Valley. This is the tool you need for finding profiles. Heres a shot I dug up from the process with the tool in use-Im (secretly) getting the profile of the side mouldings for the window frame here at my clients neighbours door...So back at the bench with my template ready to go I traced the profile and establish a series of rabbets and dados to remove the bulk of the waste. The same process of making the smaller mouldings just on a larger scale this time. Beginning with my marking gauge I carefully scribe deep, crisp lines to register the cutting iron of my plough plane.
In hind sight I should have re-sawn the stock to its finished thickness before I cut the profiles but I went ahead and started the process. It all worked out fine but for anyone out there doing this type of work, re-saw to final thickness before you cut out the profiles. Theres a lot less chance of damaging the piece.
I set the plough plane and work down the grooves into the oak. I wasnt too far along before I ran into another small, unforeseen problem. This profile is longer than the arms reach on my small plough plane so to cut these dadoes through the center portion of the blank I would need to come up with an alternate method. I thought about simply sawing down on my scribe lines and removing the waste with my router plane but I remembered seeing an attachment Lee Valley offers for their skew rabbet plane. Its a pair of posts to make an arm extension-I wondered if it would fit the threads of the plough plane? I grabbed the rabbet plane and un-screwed the arms and tried them in the plough plane...theyre the same. Good. A quick trip down to Lee Valley and $11.00 later I purchased these extension arms that fit and work fine in both plane models.
Something to consider if you already own either of these planes; a nice way to turn the small plough plane into a large.? Speaking of the name small plough plane I wonder if they may be offering a large in the future?
With the new extension arms attached I finish off the grooves...
Then its back to the moulding planes to start shaping the hollows and rounds. A series of passes from my number 4 up through to my number 12 will fair this main curve into the profile.
Now that the main shape is established I can go ahead and re-saw the stock.
The blank Im using is 2" thick by 6" wide and in the neighbourhood of 8" long; my Bad Axe back saw burns down through the hardwood with ease. A quick clean-up and Ill cross cut the piece into the two corner dentils.
At this stage they still need some fine sanding and the curves still need a little more fairing but for tonight theyre done. These two pieces will live at the top of the window mouldings creating a nice focal point thatll draw the eye to the top of the door.
It was a lot of fun making these two pieces, theyre something I probably never would have considered if this was a door I designed myself but Im happy with the look of them and Im anxious to move on to the other small architectural elements that fall at the bottom of these same side mouldings. Lets take a look at the steps I took in making them:
Back in the note book I carefully transfer my lines over to the wood stock and mark out the main dimensions of the profile. I then made another template and trace the shape to the blank. These profiles arent the same kind of shape as the previous so its not going to be a simple matter of removing the waste with the plough plane. If this was a shop full of power tools Id simply walk over to the band saw and cut out the profile? (probably cut off the lower portion of my arm in the process!) All joking aside I decided to shape these two small detail pieces with a technique I used when building boats back in Cape Breton. When shaping a stem for a small sail boat or a dinghy Id create a series of cuts down through the stock, establishing the side profile and then carve away the fat; same technique used here but only a much smaller scale. With that in mind I take the blank and on my bench hook begin the series of cross cuts...Funny with all of the beautiful back saws hanging around my work shop I reach for my Japanese pull saw; a Dozuki. For small work like this, when I want to keep things very precise while maintaining the thinest kerf possible its the Dozuki that shines. Notice where the stock is sitting in relation to the hook? A pull saw remember...that may shed some light as to why the fence is located where it is...(the plans for this and four more work shop appliances are in my book.)
The cross cutting is complete Ill move over to the face vise to rip out the waste.
Im careful to follow down the profile removing each small section as I go...this is fun!
Now that I have the main profile roughed out I use a wide paring chisel to establish the main surface area of these small components; my scribe lines are still there, deeply set into the sides of the oak so I have a nice solid reference to work down to.
The thin little groove at the top of these pieces would be a real challenge to clean out but thanks to my detail chisels Im able to accurately get in there and pare away the waste. This is a 1/16" wide, tapered chisel executed in a mortise-chisel shape to give it the required stiffness for such a narrow cutting tool. Designed by Yeung Chan, a California cabinetmaker and manufactured by Canadian knife maker Paul Beebe I cant say enough about these small chisels. Ive mentioned them before in posts but always reinforce the fact that theyre probably the most used tools in my work shop!
The sloped area is first shaped with a 6" Kutzall file; with jagged, carbide teeth they eat through wood in a hurry! Sometimes too fast so Im careful to watch my progress.
From there the curve is refined and smoothed with a finer cabinet file...
and finally a bit of sand paper...I use the Norton 3X brand which seems to work faster, is less prone to load and doesnt rip and shred quite as fast as the other brands Ive tried. To be honest, I absolutely hate sanding so the quickest, cleanest product I can find I use.
Now that the curved area is complete Ill take a full sheet of that same paper and on a 1/4" piece of safety glass work the sides of the pieces. Normally I would reach for a hand plane but because of the size of these elements and the small bead at the front, the last thing Id want is to tear out some wood or mess up the profile. A few minutes with the sand paper on glass and Im ready for the final steps in making these pieces.
The door design dictates two small squares set in the lower front edge and to make them Ill stay with the Dozuki. A couple of small cuts after careful lay-out will establish the waste area needing to be removed. I pay close attention not to saw down too far going beyond my finished surface depth.
A bit of chisel work to remove the waste...
and then some clean up. A few small chamfers again with my detail chisels and I can call these pieces done.
Here they are with the other door elements...
And finally a shot of the two lower components showing where theyll live in relation to the side window mouldings. This is actually the interior of the door and all of these pieces will be on the outside but youll get the idea!
With that Ill stop for tonight-all thats left is the scroll under the window sill and some final clean-up. With any luck Ill be slappin on some finish by Sunday and beginning the glue up early next week.
If youve read this far Ill say thanks...this post was starting to turn into a short novel! Sorry about that...just wanted to show the entire process of making these elements. I enjoyed making them and hope you enjoyed watching the process as well.
Cheers!
Subscribe to:
Posts (Atom)